
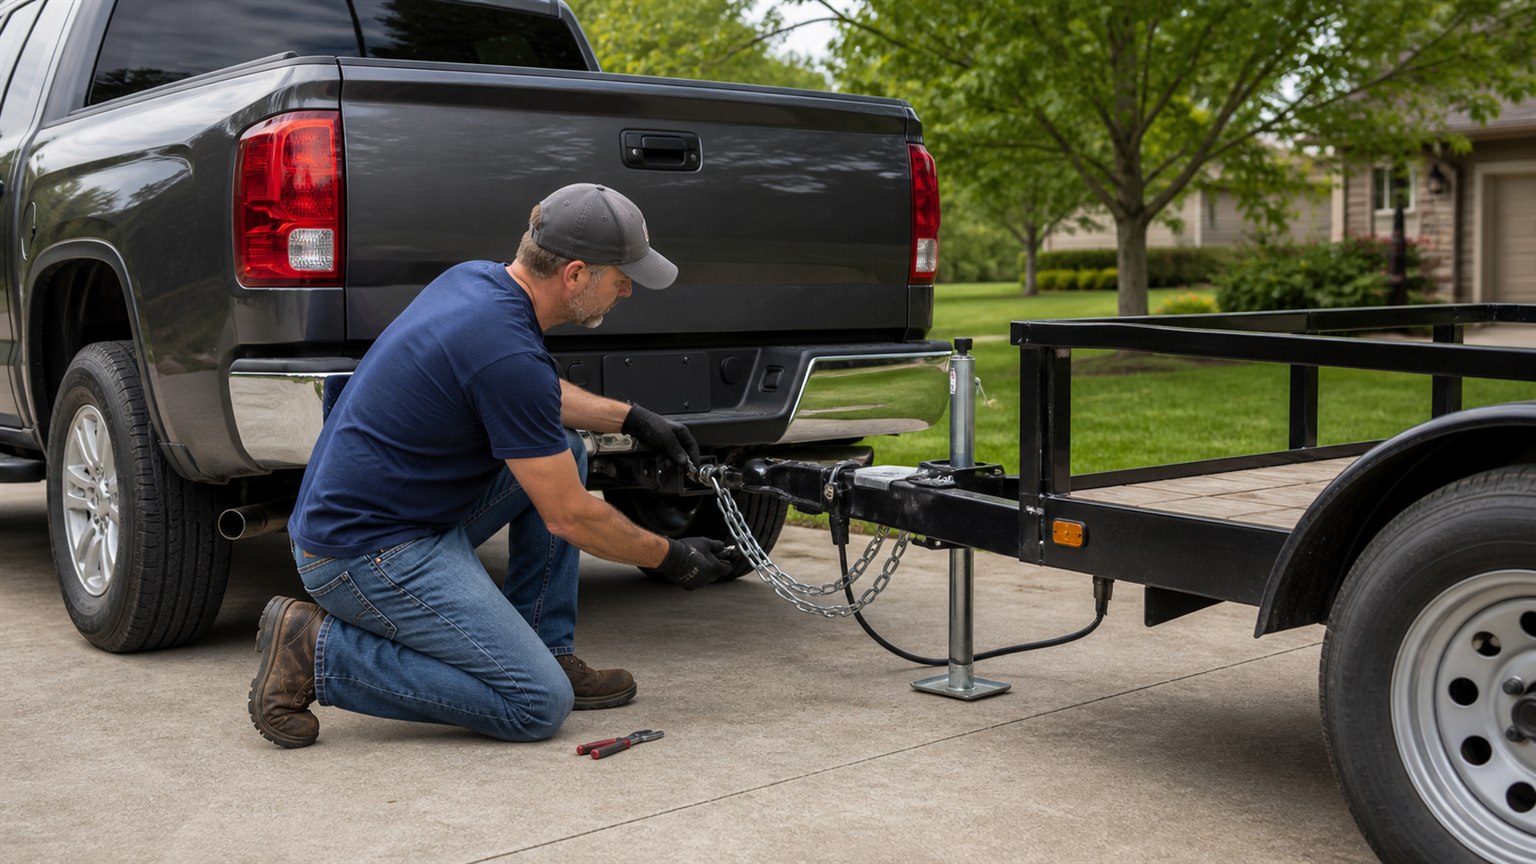
Short answer: a safe pre-towing walk-around should confirm the truck and trailer are correctly matched, the coupler is locked, the safety chains and breakaway cable are connected, the electrical plug is secure, every required light works, the tires are ready, and the load cannot shift. Do the inspection on level ground before entering traffic, then stop and repeat the critical checks after the first few miles.
Towing problems often begin with a small item that was assumed rather than checked: a latch that looked closed, a connector that was not fully seated, a chain with too little turning clearance, or cargo that settled after departure. A written sequence makes the process repeatable and prevents the least visible hardware from being forgotten.
Confirm the ratings before touching the hitch
Start with the truck, hitch, ball mount, ball, and trailer ratings. The lowest-rated component sets the practical limit. Use the exact vehicle configuration rather than a broad model claim because engine, axle ratio, cab, drivetrain, equipment package, passengers, and cargo can change the available towing and payload capacity.
Chevrolet’s official trailering and towing guide distinguishes gross combined weight, gross vehicle weight, payload, loaded trailer weight, tongue weight, and vehicle-specific trailer ratings. For any pickup, the owner’s manual, certification labels, current towing guide, and exact hitch documentation should control the decision.
- Record the loaded trailer weight, not only its empty shipping weight.
- Include passengers, tools, coolers, bed cargo, and hitch equipment in the truck’s payload calculation.
- Verify the receiver, ball mount, hitch ball, and coupler ratings separately.
- Never use the visible size of a receiver tube as proof of capacity.
Park level and make the coupling visible
Use firm, level ground with enough space to walk around both vehicles. Apply the parking brake and keep people away from the gap while aligning. Good lighting matters: dirt, heavy grease, or a dark driveway can hide a partly open latch or a damaged pin.
Lower the coupler completely onto the correct-size ball. Close the latch, insert its approved retaining pin or lock, and raise the tongue jack just enough to confirm the coupler remains attached. Return the jack to its travel position and secure its handle or removable foot according to the trailer instructions.
Inspect the receiver, pin, ball mount, and coupler
Look at each load path rather than treating the hitch as one part. Confirm the receiver pin passes through both sides and its retainer is installed. Check the ball mount for bending, cracks, severe corrosion, or an elongated pin hole. Verify that the hitch ball is tight and that the coupler socket is not visibly damaged.
Do not improvise with an undersized pin, loose hardware, or a ball that is merely close in diameter. If a fastener, torque value, lubricant, or replacement interval is specified, follow the hitch or trailer manufacturer’s instructions. A walk-around can identify obvious faults, but it does not replace periodic inspection by a qualified technician.
Connect the safety chains and breakaway cable
Attach each safety chain only to the receiver’s designated chain loops, not to a removable bumper piece or to the ball mount itself unless the manufacturer specifically designed it that way. Follow the trailer and tow-vehicle instructions for routing. Many conventional setups call for the chains to cross below the tongue, with enough slack for a full turn but not enough to drag on the road.
Connect the breakaway cable to a separate approved point on the tow vehicle. It should not be wrapped around the safety chains or clipped to a component that would leave with the trailer if the primary connection failed. Check the cable for abrasion and confirm it can move through turns without pulling the breakaway switch during normal operation.
Seat the electrical connector and test every light
Inspect the plug and socket for water, mud, bent terminals, damaged insulation, and a loose lid. Align the connector correctly, push it fully into place, and route the cable away from the road, exhaust, sharp edges, and pinch points. Leave enough movement for turns without allowing the cable to drag.
Test running lights, brake lights, both turn signals, hazard lights, and any required clearance or reverse lamps. A helper is useful, but some trucks can run an automated trailer-light sequence. GM’s current trailering safety guidance describes a pre-departure light test and recommends checking the hitch parts, attachments, chains, electrical connectors, lights, tires, mirrors, cargo, and trailer brakes before driving.
Check tires, wheels, and trailer brakes
Measure tire pressures when the tires are cold and use the pressures specified for the truck and trailer. Inspect tread, sidewalls, valve stems, and the spare. Confirm wheel hardware has been serviced and tightened according to the trailer manufacturer’s schedule; do not invent a universal torque value.
If the trailer has brakes, follow its brake-controller and breakaway-system test procedure. Confirm the controller recognizes the trailer and that braking response is smooth at very low speed in a safe area. Local requirements for brakes, breakaway systems, lights, mirrors, and safety chains vary, so check the rules for every jurisdiction on the route.
Secure the load and close every opening
Cargo should be distributed and restrained according to the trailer maker’s instructions, with the loaded weights verified rather than guessed. Close and latch doors, ramps, gates, toolboxes, and tonneau covers. Tie-downs must suit the load, show no cuts or severe abrasion, and attach to rated points.
A current owner’s towing checklist in the NHTSA public technical-service repository calls for the coupler to be locked, safety chains to cross below the trailer tongue with enough slack for turns, and cargo to be secured before departure. Those checks are a starting point, not permission to overload or ignore maintenance. The tow vehicle, trailer, hitch equipment, and cargo still have to work as one correctly rated system.
Remove loose gear from the pickup cab and bed before it can move into a footwell or damage the trailer connection. Our truck-cab storage reset provides a practical way to separate everyday items from emergency equipment and secure heavy tools low in the vehicle.
Use a final walk-around in one direction
Begin at the driver’s door and move clockwise so no area is skipped. Keep the same order every time:
- Truck tires, mirrors, cargo, and visible fluid leaks.
- Receiver, pin, retainer, ball mount, and hitch ball.
- Coupler latch, lock or pin, tongue jack, and wheel chocks removed.
- Safety chains, breakaway cable, and electrical connector.
- Trailer tires, wheel condition, suspension, fenders, and spare.
- Doors, ramps, gates, cargo restraints, and required license plate.
- Running, brake, turn, hazard, and clearance lights.
If the trip involves frequent bed access, check the tailgate hardware too. A tailgate that no longer lowers consistently deserves inspection before equipment is loaded; the site’s tailgate-assist guide explains the fitment and hardware points that matter.
Stop early and check again
After a short initial drive, stop in a safe level location. Recheck the coupler, chains, connector, tires, wheel area, cargo restraints, and lights. Loads can settle and straps can lose tension. Repeat appropriate checks at fuel stops and after rough roads, sharp temperature changes, or any unusual noise or handling.
Do not continue if the trailer sways, a component is hot, a light fails, the connector loosens, a tire loses pressure, or a restraint will not stay tight. The useful result of a pre-towing walk-around is not speed. It is a clear decision that the combination is ready—or a clear reason to keep it parked until the fault is corrected.